Posted in 6th grade

My Backpack

Over the summer I read a book called Finding Someplace. In the book the main character, Reesie, had to pack all of her most important things in one backpack before it all got destroyed by a flood. If I was in that same situation these are what I would put in my backpack.

First I put my passport and some money because I would want to be prepared about how long I might be away from home. Then I put some of my favorite clothes in my backpack because I would not want them to get ruined and I wouldn’t know how long I would be gone. Next, I put my phone and  headphones because If I had my phone I could call 911 and get help and I would not want to have to replace my headphones. I would also put my most sentimental stuffed animal because I would never want to lose it. After that I put all of my Polaroid pictures from camp because they are really happy memories that I would never want to forget. The last few things I put are a flashlight, a granola bar, a blanket, and some hand sanitizer because I feel like those would become very useful in the future. 

These are all of the things that I think would be important to keep in my backpack. I hope I am never in the situation though.
Posted in Uncategorized

How I made digital art

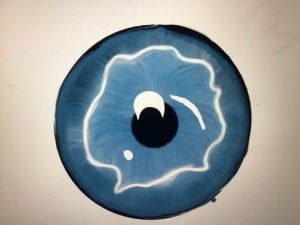
Hi everybody today I am going to tell you how I did another one of my drawings but this time it will be different then usual. Today I am going to show you how I made something on procreate which if you didn’t know is an art app so that you can do digital art. I decided to draw a close picture of an eye and I know I have talked about how to draw one before briefly but today I made one showing all of the details. Here is the picture of the eye: 

I drew this picture on my iPad because I wanted to try out something new like digital art instead of doing something easier I decided to have a challenge. 


And the way I made it was first I made a simple circle and a pupil. After I made the general shape I made the white line there and usually I would not do that but in my reference picture it was there and I also think it added to the picture. And to make that line first I made a squiggle around the pupil and then in procreate used the smear to make it look more blended into everything else. And bye the way I used the smear a lot when I made this because I wanted things to look blended.


After I made the line I started messily drawing little lines from the pupil to the white line and then after that once again I used the smear over that to blend them together and after that I did the same but I switched colors to darker blues and I went from the rim of the eye to the white line and again used the smear to blend them.


Lastly I did some highlights which were pretty easy because all I did was make my brush bigger on procreate and switch the color to bright white and make those little lines. 


And that is how to draw a realistic eye on procreate I hope this helps bye.

Posted in Uncategorized

One of my best drawings

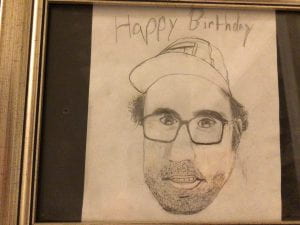
Hi this is Soledad and today I’m going to show you a drawing of my dad that I made during the summer. It is a very realistic drawing that took a lot longer than all of the other drawings that I showed you. Just so you know this is a portrait of my dad.

Here is the drawing

The way that I drew this is first I made a oval shape and then I made a cross in the oval. Then I drew the eyes and to do that you draw the main shape of a eye and then you draw a circle with a small square next to the pupil and the square is the highlight so make sure that you don’t color it in. And then I left a half circle at the bottom of the eye which you should color in lightly so that it is lighter than the rest of the eye. Then you do that for both eyes. After that you draw the eyebrows and to do that you draw a bunch of small lines a little bit messily and put it into the shape of the person’s eyebrows depending on who you are drawing.

 For the nose you draw the general shape of it and then shade it in wherever it needs to be shaded in and draw the nostrils. And again for the mouth you draw the shape of it and then shade it in wherever the shadows are depending on the lighting of your reference photo.

The next thing to draw is the ears. To draw ears just like the nose you draw the general shape of the ear depending on who you are drawing. Then you want to shade in the ears where they need to be shaded and then you are done with the ears.

Next is the mouth. To draw the mouth you draw the general shape of it which once again depends on the person you are drawing. Then you draw a lot of shading on the tips of the mouth and for the teeth you draw squares pretty much and then put a little bit of shading. Now draw any freckles or things like that and you are done

That is how I drew a realistic drawing of my dad.

Posted in Uncategorized

My First Post

This summer I have been making a lot of realistic drawings. And I have improved a lot.

I have mostly drawn my family but I have drawn a few celebrities. And one time I drew someone random and I’m not even sure if anyone looks like the person I

This blog will have a lot of my drawings but every once in a while I will post about something else like Roblox or just what I’ve been up to.


I will also try to teach you how to play Roblox sometimes. And I might even show you some Mario cart.

I will also show you pictures of my drawings and if I draw someone in my family or someone you probably don’t know I will tell who it is.


But most of the time I will draw celebrities. 

will also do some tutorials for how I draw what I drew.

And sometimes I will just show you what I’m doing for the weekend.